Wire Expression2:Guide
From GMod Wiki
This section is a guide which will cover most of the aspects in the E2. Feel free to add content whenever possible. Please also keep a decent language, layout and a proper use of the wiki tools. And do remember that this guide is for people that have just started with the E2, so keep the language and examples simple and easy to understand. The base tutorial was written by Matte, and can be found here.
Contents |
Basic Arithmetics
Calculating math is what the E2 is most widely used for. Im gonna give you examples on how to calculate basic arithmetics in the E2.
Addition
Addition is the same as plus. To add in the E2 simply use the plus sign(+). Example:
N = X + Y
Subtraction
Subtraction means minus. To subtract in the E2 we use the minus sign(-). Example:
N = X - Y
Multiplication
Multiplication is probably the most widely used operation in the E2. It uses the star sign (*). Example:
N = X * Y
Division
Division is also a widely used mathematical operation in the E2. It uses the slash (/) Example:
N = X / Y
Exponentiation
Exponention is not so widely used. It means how many times the argument is multiplied by itself. Example:
N = X ^ 3
Could also be written
N = X*X*X
Square Root
The square root of a value is the number, that gives the value when multiplied by itself. It uses the square root command(sqrt()). It is hard to explain, so I will give you some examples.
sqrt(9)  = 3   because 3 * 3 = 9
sqrt(16) = 4   because 4 * 4 = 16
Cube Root
Cube root is basically the same as square root, execept it returns the number which must be multiplied by it self twice to get the main value. It uses the cube root command (cbrt()). Example:
cbrt(27) = 3   because 3 * 3 * 3 = 27
cbrt(64) = 4   because 4 * 4 * 4 = 64
pi
Pi is the ratio between a circles radius and its circumference. If a circle's radius is 1, it's circumference is pi. It uses the pi command (pi()). Pi is approximately equal to 3.14159265358979323846264. Example:
Circumference = CircleRadius * pi()
Round Down
The round down command (floor()), is used to floor a value. I.e floor(2.71828) would be 2. Example:
floor(pi()) = 3
floor(e())  = 2

where
pi() = approx. 3.14
e()  = approx. 2.71
Round Up
Round up (ceil()) is the same as floor, except that it rounds up. Example:
ceil(pi()) = 4
ceil(e())  = 3

where
pi() = approx. 3.14
e()  = approx. 2.71
Round
Round command (round()) will round the value to the nearest integer. 1.499 or less would equal 1, while 1.5 or larger would equal 2. Example:
round(pi()) = 3
round(e())  = 3

where
pi() = approx. 3.14
e()  = approx. 2.71
random() and randint()
These functions take 0-2 arguments and return random numbers.
The arguments determine the range of the random numbers returned:
random(): 0 to 1random(Max)/randint(Max): 0 to Maxrandom(Min,Max)/randint(Min,Max): Min to Max
randint will get a random integer/rounded number, while random will get a real/decimal number.
This means, while random(x,y) may return 4.62648323979853562951413, randint(x,y) might return 4 or 5.
Example:
random(23,42)
- will get a random value between 23 and 42.
Basic Statements
The syntax of the E2 is actually pretty simple and also pretty simular to both E1 and C/C#/C++ . For the first examples I will post both the E1 syntax and the E2 syntax, so all of you guys that already know a bit of E1 can learn the basics of E2. To start off with, here's a legend for the different types of operators in a conditional statement (if-statement).
==     Is it equal to?
!=     Is it not equal to?(Is it anything alse, but?)
<      Is it less than?
>      Is it greater than?
<=     Is it less than or equal to?
>=     Is it greater than or equal to?
In this example we will make a number increment at the push of a button. In E1 we would write it like this:
I@ Button
O@ Output
Line1: If Button == 1 -> Output +=1;
While in E2 we would have written:
@inputs Button
@outputs Output

if (Button) {Output++}
I am going to break it down for you guys.
if (Button)
This is the same as "If" in E1, except you put the arguments inside a parentheses.
This function means "if Button is equal to one, then proceed to then". You may have noticed that I only wrote the name of the variable incide the parentheses. This is because when the E2 finds the name of a variable inside the "if ()" paretheses, it will default to checking if that variable is true. It will check if the variable is equal to anything but zero. We could wery well have written if (Button==1), but it is longer and in E2 you only have to put a variable inside an "if ()"-function, and it will ask itself "Does this variable equal anything besides zero??"
{Output++} Like the arrow (->) in E1, the curly brackets ( {} ) means then in E2. In this example I have chosen the C++ way of incrementing a number. We could also have written:
{Output+=1}
Which then is exactly the same as:
{Output=Output+1}
The only thing (I wouldn't call it a flaw) with the ++ command is that you can't set how much to increment the variable by. It will always increment the variable by the default 1.
Intermediate Statements
For more possibilities you can start using "else", "elseif" , "|" (or), "&" (and) and "!" (not). To give you an example:
@inputs Button1 Button2
@outputs DoorLength Screen

if     ((Button1 | Button2) & (DoorLength > 40)) {DoorLength=0}
elseif ((Button1 | Button2) & (DoorLength <  1)) {DoorLength=41}
else {Screen=1}
Normally I would not have spaces between the or, and and greater/less than functions. I just did it for the purpose of this example to give a better overview.
Here you can see, I have used both "|"(or) and "&"(and). The first if-statement would return true if Button1 or Button2 is pressed, meanwhile, DoorLength has to be greater than 40. Otherwise, it would return zero, and the expression would run to the elseif-statement. You can see the elseif statements this way: If the first if returns true, it will not run the elseif-part. And if the first if returns false, it will run the elseif-statement as if it was a normal if-statement. If the elseif-statement returns false, the expression will go on to the else-statement, and to what it's told by that statement. Here, as the first if-statement, Button1 or Button2 must be pressed, however, DoorLength has to be less than 1. If none of these statements returned true, then the expression would wait until one of the if's were true.
To show you the use of "!" (not) I'm gonna make a new example.
@inputs Button
@outputs Screen

if (!Button) {
    Screen=1
} else {
    Screen=0
}
In this example we use the function "not". Like I said earlier, if you just input a variable in the if-parentheses, the if ()-statement will check if that variable is equal to one. Hovewer in this example it will check if the variable (Button) is not equal to 1. In other words, it checks if the variable is anything but 1.
So in this example, the screen would show the number 1 until Button is pressed. Then the screen would show 0 until the button is released again.
Advanced Statements
To really benefit from the E2 to your contraptions you will need "interval()", "clk()", "$" (delta) and "~" (Input-triggered execution?)
$ (Delta)
Delta is an operator that can calculate the change of a variable since the last execution (TODO: Check if it is actually since the last use of delta). This means that if A=1 at a given time, and A=2 at the next execution, the delta of A ($A) would equal 1. An example to clear things up:
Execution 1 - (In1 = 1): $In1 = 1
(In1 has currently changed to 1 from 0, which all variable are at the first run. $In1 is now 1)

Execution 2 - (In2 = 1): $In1 = 0
(In1 is still 1, therefore delta of In1 = 0)

Execution 3 - (In1 = 0): $In1 = -1
(In1 has now changed to 0 again. It has decremented by one value. $In1 is now -1)
I hope this explains what delta is in an easy way.
interval()
You may have noticed that many expressions include a function called "interval". Interval determines how many milliseconds the expression will wait until it reads the code again. Example:
@inputs Button
@outputs Screen
interval(100)

if (Button) {Screen++}
In this example, the screen will get a number added every 100ms. That equals 10 numbers per second.
~ (Input-triggered execution?)
The "~" sign is used to check wether the current execution was caused by an input changing. It is useful when you, for instance have an interval, but don't want your output to increase with the interval. I will give you an example:
@inputs Button
@outputs Screen
interval(10)

if (~Button&Button) {Screen++}
In this if-statement, it asks itself: "Has Button changed?" and "Is Button equal to 1?". Now the screen would only increment if the button is pressed, regardless of the interval.
clk()
As you probably already know, the E2 reads the code again if the interval tells it to, or if an input changes. Unlike the "~"-sign, which could be useful when ignoring interval(), the clk is useful for ignoring input changes. Let me give you an example.
@inputs Time Button
@outputs Screen1 Screen2
interval(1000)

Screen1=Time*10
if (Button&clk()) {Screen2++}
Here, imagining a timer is hooked up to the "Time"-input, Time is an input that is always changing. Since our interval is so large, we wouldnt want our second screen to add every time the "time"-input changes, so here is the smart thing about the clk()-function I added clk() to the if statement, which means "If this is triggered by the interval". I use this for a lot of stuff, for instance hints and chat messages, which i will talk about later.
@trigger and @persist
You may have noticed that when clicking "New Expression", the expression will automatically make a template looking like this:
@name
@inputs
@outputs
@persist
@trigger all
Now, the @name, @inputs and @outputs are self-explanatory, however, the @persist and @trigger, are not. I am going to explain it for you here.
@trigger
The @trigger-directive can enable or disable selected inputs from triggering executions. I'm going to use an example I have used earlier:
@inputs Time Button
@outputs Screen1 Screen2
interval(1000)

Screen1=Time*10
if (Button&clk()) {Screen2++}
In that example I used the clk()-function to stop the screen from incrementing because time was an input that was constantly changing. By using the @trigger-directive we no longer need clk(). It would look like this:
@inputs Time Button
@outputs Screen2
@trigger none
interval(1000)

if (Button) {Screen2++}
By setting @trigger to none, we told the expression not to execute from input changes, but what if we had an input we wanted it to execute from at the same time as "Time" was constantly changing?
@inputs Time Button
@outputs Screen2
@trigger Button
interval(1000)

if (Button) {Screen2++}
Then we would write this to the @trigger-directive. Now the code would only execute with the interval, or if Button has changed. The @trigger-directive is set to "all" by default. This means the expression will trigger from all input changes.
@persist
The @persist-directive is for remembering a value inside the expression. If we wanted to increment a value internally (not using the value as an output), and we didnt use the @persist-directive we would get the error "Cannot perform operation on a temporary value". Let me give you an example:
@inputs Button Rate
@outputs Screen
interval(100)

if (~Button&Button) {TempVal++}
Screen=TempVal*Rate
This would give us an error. The solution to the problem? Add TempVal to the @persist-directive. The code would now look like this:
@inputs Button Rate
@outputs Screen
@persist TempVal
interval(100)

if (~Button&Button) {TempVal++}
Screen=TempVal*Rate
Basic Command Syntax
Say you had a target finder and you want to get the name of your target. Here I am gonna explain some of the most basic [ENTITY]-commands. To start off with, I'm gonna make an example where you get the name of an entity for instance from a target finder.
@inputs Target:entity
@outputs Name:string
interval(100)
Name = Target:name()
In this example you can see the input was "Target:entity". Here you may understand that the input is of the type "entity". If it was a normal numeric input, we could have written "Input", but since the entity-commands only takes entity-data, we will need to define that the input contains entity-data. If we tried to wire a normal input to an entity output we would get the error "Data type mismatch, Input takes NORMAL, output gives ENTITY!"
You can also see that the Name-output has the data-type "string". Now, string may mean nothing to you, but it's actually pretty simple. Just like a normal output gives numbers, a string-ouputs will give letters, words and sentences. A string could, for instance, be "Hello, World!". Just remember, you can't wire a string, or entity input/output to a normal numeric input/output.
Now, you can see I have set "Name" equal to "Target:name()". This is because the "name()" command outputs the name of the entity-input it's attached to via the colon (:). name() will only work on players.
I'm gonna give you another example to hopefully clear things up a bit.
@outputs Owner:string
Owner=entity():owner():name()
In this example, you can see I have also used the "name()"-command, but I have also used two new commands, the "entity()" and the "owner()" command.
Like I said earlier, the "name()" command outputs the name of the entity it is attached to via the colon, but here the entity is the entity():owner(). The "entity()"-command points out the entity of the expression 2 chip, and the "owner()"-commands points out the owner of the entity its attached to via the colon. So "entity():owner()" would be the owner of the E2. You. The output "Name:string" would now contain your name in string format.
Now onto how to wire a string output from the E2 to a wired text screen. Before spawning the text screen make sure to check "Force show text". The wired text screen has by default 6 inputs, Clk, Text, StringClk, String [STRING], StringNum and Value 1. What we are gonna do is wire the String[STRING] input to the Name[STRING] output of the E2 and StringClk to a Constant Value of 1. The text screen will now display the string you outputted from the E2. Here are more commands you can use to get string(text) output:
Entity:name()      Gets the name of a player
Entity:steamID()   Gets the steam ID of the player
Entity:type()      Gets the class of an entity
Entity:model()     Gets the model of an entity
And here are some commands that return entities:
Entity:aimEntity() Gets the entity that the entity is aiming at
entity(Number)     Gets the entity associated with the id
entity()           Gets the entity of the expression
Entity:owner()     Gets the owner of the entity
owner()            Shorthand for entity():owner()
Self-Aware
Self-Aware in an expression is commands the expression can physically do by itself. For instance, with the expression 1, you had to have an external thruster to influence the physics in Garry's Mod. With the E2, however, you can apply thrust from the chip itself, print messages in the chat, execute console commands and much more.
print() and hint()
To print messages into the chat, we must first use the "print()"-command, then specify what to print. The arguments the print()-command takes must be formatted as a string, i.e. text with quotes as in "Hello, World!". I'm gonna give you an example on how to print messages using the print()-command:
@inputs Print

if (Print) {print("Hello, World!")}
This code would print the sentence "Hello, World!" in the chat. However, now that the string data-type is properly implemented in Wiremod, we could actually input what to print in the chat. Example:
@inputs Print Text:string

if     (Print&(Text!="")) {print(Text)}
elseif (Print&(Text=="")) {hint("You have not inputted a text to print!",7)}
In this example, you can see I have told the expression to print the inputted text [I]if[/I] a text is inputted. If no text is inputted I told the expression to [I]hint[/I] the owner "You have not inputted a text to print" for seven seconds. hint() works in the same way as print() exept, you need to specify how many seconds the message should appear. Hints will show up on the right of your screen as little text bubbles.
Execute Console Commands
In E2, you can also execute console commands. This will only work if wire_expression2_concmd is enabled, which is not the case, by default. To execute console commands we use the command "concmd(<command>)". Im gonna give you an example:
@inputs EnableCheats DisableCheats

if (EnableCheats)  {concmd("sv_cheats 1")}
if (DisableCheats) {concmd("sv_cheats 0")}
This would enable cheats in singleplayer, or if you are an admin in multiplayer.
While the print()-command print blue messages in the chat, you can make yourself say things automatically, by using concmd("say <msg>"). An example:
@inputs Say Message:string

if     (Say&Message!="") {concmd("say "+Message)}
elseif (Say&Message=="") {hint("You have not inputted text to say!,7")}
In this example, you would say the message inputted, if it is [I]not equal[/I] to "", which is nothing. If it was equal to "", it would hint you that you have not inputted a text to say.
Changing Colors
Something new about the E2 is that you can program color changes to other entities you own. To change the color of an entity, we use E:setColor(N,N,N), where the E stands for which entity to change color, and the N's are the RGB values. Now you may wonder what RGB is. RGB stands for Red, Green and Blue. This color method is [I]subtractive[/I], which means we subtract colors from black to get the color we want. If we wanted to get red, we would simply max the red value and leave the green and blue value to zero. It would look like this:
@inputs Button

if (Button) {entity():setColor(255,0,0)}
Here's a list of different colors:
Black   - (  0,  0,  0)
White   - (255,255,255)
Red     - (255,  0,  0)
Green   - (  0,255,  0)
Blue    - (  0,  0,255)
Cyan    - (  0,255,255)
Magenta - (255,  0,255)
Yellow  - (255,255,  0)
Orange  - (255,192,  0)
But say if I wanted to make my prop invisible. Then we need to add another value after the RGB, called [I]alpha[/I]. Aplha is the opacity (see-through-ness-ish) of the color. Alpha is defaulted at 255, which is maximum opacity. If we would want an invisible prop, we would need to set alpha to zero. It would look like this:
@inputs Button

if (Button) {
    entity():setColor(255,255,255,0)
}
As you can see I've set the color to white(not really nescessary), and set opactiy to minimum. Our E2 would now be invisible.
Vectors
Explaining Vectors
To use vectors and applyForce (etc..) you will first need a basic understanding of what vectors are. Vectors are basically a direction in a 2d(XY) or 3d(XYZ) space. To make a vector you will need two XY/XYZ co-ords. The first co-ordinate specify where the vector starts, and the second tells us where the vector is headed for. To create a vector example, I will use my mspaint skills to draw it up for you.
Say we had a 2D vector with the coordinates (-1,-1,0) and (,2,2,0). This would look like this when drawn up in a co-ordinate system:
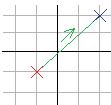
As you can see, the red cross is the first XYZ(-1,-1,0) and the blue cross is the second (2,2,0). The vector, however, is the [I]green line[/I], and it's direction is from point 1 to 2. You may notice that I left the Z co-ords to zero in both points. This is because it would be almost impossible to draw otherwise. This is another example that attemp to draw a 3D vector:

(Image taken from intmath.com) In this example we have a vector from co-ordinate (0,0,0) to co-ordinate (2,3,5)
Now, that you hopefully understand a bit more about vectors, we move on how to use vectors within GMod.
Vectors in Gmod
When making a vector in E2, we use the vec(X,Y,Z) command. This command will always make the vector start at the local (0,0,0) co-ordinate, which in any case, is the E2, and it will make the vector end at the (X,Y,Z) you input. Vectors are also used to store GPS locations. For instance, to store the owners position, we would use this code:
@outputs OwnerPos:vector
runOnTick(1)

OwnerPos=owner():pos()
Using applyForce()
The function vectors are probably most used for, is the applyForce()-function. This function is almost the same as a vector thruster, except it's built into the E2. The arguments this function takes is what direction/vector to apply force against. To give you an example:
@name Vector Example
runOnTick(1)

applyForce(vec(0,0,1))
This example would constantly apply thrust against the vector (0,0,1), although this is not enough to overcome gravity. Remember the vector takes arguments (X,Y,Z), so (0,0,1) would be upwards. Hope this cleared up a bit. Now onto how to make a E2 follow the owner (you).
To make it follow the owner, we must first get the owner's position. We get this by using the owner():pos()-command. One thing though. The owner's postiton is stored as GPS co-ordinates, which is co-ords according to the center of the map, not the E2. See it like this: If the owner stands at the center of gm_flatgrass, his GPS position would be (0,0,0). However, his position according to the E2 will be different depending on where the E2 is on the map. If the E2 were 1000 units underneath him, his local position according to the E2 would be (0,0,1000), while the GPS position is still (0,0,0). To use GPS-positions within the E2, we will firstly need to convert them to the E2's local co-ordinates.
To convert from world to local co-ordinates, we first need the world position of the entity we are converting as local position (0,0,0), which in this case is the E2 chip. Then we need to subtract the E2's position from the target position. Example:
runOnTick(1)                   #This will execute the expression every game tick.

TargetPos=owner():pos()        #The position the E2 will thrust towards.
CurrentPos=entity():pos()      #Current position of the E2.
Vector=TargetPos-CurrentPos    #The vector from the E2 to the target position.
As we got our vector, we're only missing the applyForce()-part. This is very easy, as it is just to insert the vector we got into the argument parenthesese.
Example:
runOnTick(1)                   #This will execute the expression every game tick.

TargetPos=owner():pos()        #The position the E2 will thrust towards.
CurrentPos=entity():pos()      #Current position of the E2.
Vector=TargetPos-CurrentPos    #The vector from the E2 to the target position.
applyForce(Vector)             #Applies force in the specified direction and magnitude.
This E2, would follow it's owner. But as you probably will notice if you go into noclip, the expression will no longer collide with you and become very wobbly. To get it less wobbly we just add a delta calculation to the applyForce()-line. Example
@persist Vector:vector
runOnTick(1)                   #This will execute the expression every game tick.

TargetPos=owner():pos()        #The position the E2 will thrust towards.
CurrentPos=entity():pos()      #Current position of the E2.
Vector=TargetPos-CurrentPos    #The vector from the E2 to the target position.
applyForce($Vector*10+Vector)  #Applies force in the specified direction and magnitude.
As you can see the expression now applies force towards the delta of the vector plus the vector. You may also notice that I have added the Vector:vector to the @persist line. This is because you cannot calculate delta on a temporary variable, since the delta operator compares the change between the last execution and now, we need the E2 to remember the Vector variable.
In the example delta/$ is like a velocity dampener, but it is a better idea to use -E:vel() instead of $Vector because vel() is not execution dependant, $ was used simply to show it could be used for dampening.
Remember Force=Acceleration*Mass, so when using applyForce it is recommended that you multiply your vector by the entity's mass using E:mass(), if you are forcing the expression E would be entity(), if you don't do this then a oil drum weighing 30 will be 30 times slower than an expression weighing 1.
Angles
Angles in E2
The format of angles in E2 is pretty similar to the vector format. An angle is made up of three numbers. The first number represents the pitch in the angle, the second represents the yaw, and the third and last represents roll. Think of these angles like an airplane.
The pitch is the angle of the nose/back of the airplane. To increase the pitch angle, we would raise the nose and lower the back.
The yaw is like the axis of turning. To increse/decrease the yaw, we would move the nose to the left or right and he back to the opposite direction.
The roll is pretty much self-explanatory. if this angle increases, the airplane will roll like your dog does on the floor. Like pitch, but sideways.
I reckon you have used the gyroscope before? The angles in E2 works like that. I'm gonna make an example on how to make a gyroscope in the E2.
@name Gyroscope
@outputs Pitch Yaw Roll Angle:angle
runOnTick(1)

Angle=entity():angles()
Pitch=Angle:pitch()
Yaw  =Angle:yaw()
Roll =Angle:roll()
This code will output the pitch, yaw and roll angles, but also an angle output containing the three angles formatted as an angle.
Using ApplyAngForce
ApplyAngForce is used to apply angular force to the entity specified. When getting an angle from an E2, the angles goes from 180 to -180. The angles of a stabilized E2 is (0,0,0).
@persist Ang:angle
runOnTick(1)               #This will execute the expression every game tick.

Ang = entity():angles()    #The angle of the E2
applyAngForce(-Ang)
This example will probably spazz, but the basic principle is easy to understand. It applies force to the negative angles of the E2, which means that if the E2's angles are 0,0,0, the applyAngForce function would not apply any force at all. However, if we tilt the E2 10 degrees on the pitch axis, the function will apply force to that axis with a force of -10 (The pitch of the E2 negated).
To make it stop spazzing, we must add another argument to the angle calculation.
runOnTick(1)                   #This will execute the expression every game tick.

EE   = entity()                #Expression Entity, making it into a variable makes less to type and process
Ang  = EE:angles():setYaw(0)   #The angle of the E2, with yaw set to 0
AngV = EE:angVel()             #The angular velocity of the E2
applyAngForce(-Ang*25 - AngV*2)
There. You may notice that I set yaw to 0. This is because we don't care how the prop turns on the yaw axis. I added the angVel() line because it gives us the angular velocity of the entity. This works pretty much like delta.
But what if we got a prop that weighs much, much more? Here's another argument to add to the calculation. The "mass moment of inertia" (usually shortened to just "inertia"). You should multiply your angle by inertia so no matter what prop is used it will still rotate at the same rate, multiply your angle by shiftL(ang(E:inertia())), E again being entity() if you are forcing the expression.
runOnTick(1)                       #This will execute the expression every game tick.

EE      = entity()                 #Expression Entity, assigning it to a variable makes less to type and process
Ang     = EE:angles():setYaw(0)    #The angle of the E2, with yaw set to 0
AngV    = EE:angVel()              #The angular velocity of the E2
Inertia = shiftL(ang(EE:inertia())) #The inertia of the E2
applyAngForce((-Ang*25 - AngV*2)*Inertia)
Here we multiply the angles angular velocity by the inertia of the prop.
If we combine the last expression from the vector tutorial, we could make the E2 follow us, while it always stays level. Here:
runOnTick(1)

EE      = entity

Ang     = EE:angles():setYaw(0)
AngV    = EE:angVel()
Inertia = shiftL(ang(EE:inertia()))
applyAngForce(-(Ang*25  + AngV*2)*Inertia)

TargetPos  = owner():pos()+vec(0,0,120)
CurrentPos = EE:pos()
Vel        = EE:vel()
Vector     = (TargetPos-CurrentPos)-Vel
Mass       = EE:mass()
applyForce(Vector*Mass)
