DarkRP:MRP12
From GMod Wiki
| This page has been nominated for deletion. Deletion is due within approximately 30 days from nomination, unless the deletion has been disputed on the talk page. See more pages nominated for deletion here. Reason for deletion: Not what Garry wants the wiki to be used for Last Edit was made on 11/16/2011 |
Contents |
What is a GUI?
A GUI is short for Graphical User Interface, it skips all those boring shell commands to bring you a nice clean GUI, Ideal for first time computer users. The same applys to Garrys Mod, however in this case; It completely depends on GUI to play.
Getting Started
Creating a GUI is pretty easy if you can find a technique that works for you. In order to use mine, you need to be running GarrysMod and preferably on a DarkRP server (doesn't have to be yours). You must first start by going to Garrysmod/LUA and creating a new file called mygui.lua
Next, you must enter the following console commands into garrys mod:
bind n lua_openscript_cl mygui.lua
bind m lua_run_cl OpenMyGUI()
The purpose of these commands are to allow us to reload the file at runtime and then to open our GUI after we make edits, this means we don't have to restart singleplayer or a server just to see changes. Plus it's made on the client, which means you only need to be on a server where scriptenforer is not on!
Starting to draft a GUI
Creating the basic frame
Open up your mygui.lua file in your favourite lua highlighting program, if you don't have one. I recommend Notepad++ with the Lua Lexer for Garrys Mod.
Start with the following code:
function OpenMyGUI()

end
Now we need to add a DFrame, or otherwise known as a form. This will hold all our derma controls, and will keep them from floating and looking a mess. To do this, add the following code between the function:
	local DermaPanel = vgui.Create( "DFrame" )
	DermaPanel:SetPos( (ScrW() / 2) - 200, (ScrH() / 2) - 250) --Center it (For example, (ScrW() / 2) - Half of Width Size)
	DermaPanel:SetSize( 400,500 ) -- Size it
	DermaPanel:SetTitle( "Arrest Severity" ) -- Title of the frame
	DermaPanel:SetVisible( true ) --It's visible
	DermaPanel:ShowCloseButton( true ) --You can close it, we will set to false later
	DermaPanel:MakePopup() -- Show the frame
As the code describes in the comments, we create a new DFrame, set it to the center, size it, title it and show it. We will add a continue button to replace the close button later.
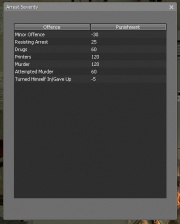
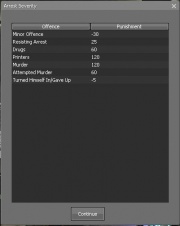
Adding a choice box
We will now create a new choice box to select which offences the person commited, it also has multiselect to select more than one offence
        local DermaListView = vgui.Create("DListView")
	DermaListView:SetParent(DermaPanel)
	DermaListView:SetPos(25, 50)
        DermaListView:SetSize(350, 400)
	DermaListView:SetMultiSelect(false)
	DermaListView:AddColumn("Offence") -- Add column
	DermaListView:AddColumn("Punishment")
	DermaListView:SetMultiSelect(true) --Allow multiselect

	//Add the offences to the list
	DermaListView:AddLine("Minor Offence", -30)
	DermaListView:AddLine("Resisting Arrest", 25)
	DermaListView:AddLine("Drugs", 60)
	DermaListView:AddLine("Printers", 120)
	DermaListView:AddLine("Murder", 120)
	DermaListView:AddLine("Attempted Murder", 60)
	DermaListView:AddLine("Turned Himself In/Gave Up", -5)
We have now created a gui that uses a multi-select list box. In the next section we will make a label show how long the victim will serve in jail, but also; why not add the darkrp skin?
To add the skin, use the following code on a derma object
DermaObject:SetSkin("DarkRP")
Adding a continue button
It is now time to create a continue button that will submit data to the server, the button will be covered in this section and the functionality in the next bit. In the next tutorial though, you will learn how to recieve the data we send off and use it.
	local DermaButton = vgui.Create("DButton")
	DermaButton:SetParent(DermaPanel)
	DermaButton:SetPos(157.5, 460)
	DermaButton:SetSize(75, 30)
	DermaButton:SetText("Continue")
	DermaButton:SetSkin("DarkRP")
As you can see, we create a new button, make it's parent the panel, size and position it, skin & caption it.
Add the last bit's of functionality
We need to send a datastream to the server telling it exactly which punishments have been chosen, to do so, we will use the DoClick hooked function. But first, we need to add a console command to our gui function.
--From:
function OpenMyGUI()
--To:
function OpenArrestDialog(PlayerIndex)
DermaButton.DoClick = function()
datatsream.StreamToServer("ArrestDialog", DermaListView:GetSelected())
DermaPanel:Close()
end
We send a datastream, and finally close the gui. By the time the gui closes, a notify will have appeared saying the person has been sent to jail and for the specified time.
Moving on
Thankyou for reading part 2 of MyRP 1, to continue with the tutorial, click here.
