Combat assistance drone
From GMod Wiki
| This page has been nominated for deletion. Deletion is due within approximately 30 days from nomination, unless the deletion has been disputed on the talk page. See more pages nominated for deletion here. Reason for deletion: Not what Garry wants the wiki to be used for Last Edit was made on 11/16/2011 |
Contents |
Combat assistance drone
| Combat assistance drone: Combat assistance drone |
| A wire tutorial for a hovering drone that follows the owner and attacks enemies | |
| ZeroPlus | |
| | 4/11/10 |
| | - |
Please bear with me, as this this is my first contribution to this site.
In this tutorial, I will explain how to make a drone that assists you in killing NPCs and possibly in becoming a mingebag protecting you from mingebags. I think this process is tedious enough that the common mingebag wouldn't attempt it, so we're relatively safe.
Notes
- In the tutorial, multiple elements will be used more than once. To avoid confusion, each element will be assigned a number. Ex: Target finder(1) or target finder(2). This is so you know which one I'm talking about; it does not mean you should spawn that number of elements. Later in the process, each element will be called by a certain name and will more easily identified.
- Near the end, some elements with numbers are going to be wired to others. The first number in parentheses is the nth one you placed, and the second set of parentheses pertains to the in/output of that wire element. For example: Turret(3)(fire)->target finder(2)(1). This means that the fire input of the 3rd turret you've placed corresponds to the "target acquired" output of the 2nd target finder you've placed.
- !WARNING!
- Due to small lua errors in the wire facer and wire freezer, this contraption is not adv_dup-able. Once you get the hang of it, you could be able to rebuild this whenever you want. If anyone has a fix for this, please say so.
Requirements
For best results, you will need:
Spacebuild Model Packs isn't required, but it has the best prop for the task at hand.
Creation
Setting up
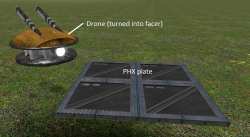
- Spawn a PHX plate (I used a 2x2, but a 1x2 works better).
- Spawn your drone base. If you're using SB model packs, under Browse, go to Spacebuild Model Packs->Spacebuild->Nova, and spawn the "drone2".
- Using the "facer" stool from the Wiremod UWSVN, right-click on the drone, then left-click anywhere near you. This should spawn another drone.
- Delete the first drone. You only needed it to get the prop type for the facer tool.
Building the drone
- Using the wire turret tool, change the variables to:
- 4 bullets per shot
- 0.1 second interval
- 3 damage per shot
- 0.1 spread
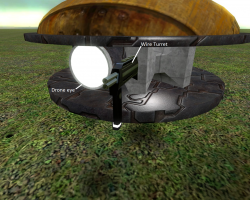
- Put the turret on the drone, right next to the eye.
 These two are used to detect the enemy's position.
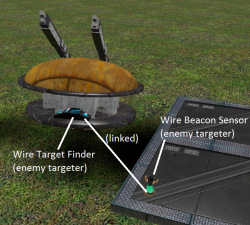
- Spawn a wire target finder(1) on the back of the drone, with the following settings:
- Target players
- Do not target owner
- Target NPCs
- Range: 2000
- If you want the drone to only target a specific player or NPC, enter the player name or NPC type into the appropriate filter
- Spawn a Sensor Beacon(1) on the PHX plate, with only these options checked:
- Split X,Y,Z
- Output distance
- Output world position
- Link the Beacon to the Finder
- Using the Namer tool, name the sensor and beacon "enemy targeter"
 Be sure the beacon sensor(2) is facing front. You don't need to nocollide anything to get the beacon back there.
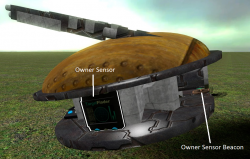 These two are used to detect the owner's position.
 - Spawn a target finder(2) on the side of the drone, with these settings:
- Target players
- Range: 100000000000000
- Name filter: (insert your nickname here)
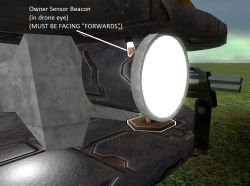
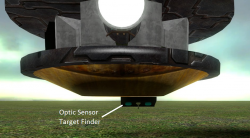
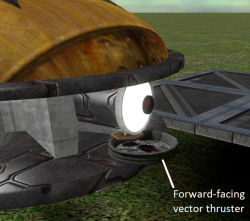
- Spawn a sensor beacon(2) behind the drone eye (see picture):
- Split X,Y,Z
- Output distance
- Output world position
- Be ABSOLUTELY sure that the figure is facing directly forward. However, directly spawning the beacon directly on the drone results in an angle. The best way to make sure is to look at the ghost for the future beacon sensor. If it's not aligned, unfreeze the drone, let it hit the ground, and re-snap and re-freeze it. Check the ghost again. If not aligned, repeat. Eventually, the ghost should be directly aligned with the drone.
 Orientation does not matter in this case, and an accompanying beacon sensor is not needed.
 - Link the beacon sensor(2) and target finder(2), and name them both "owner targeter"
- Spawn a target finder(3) on the bottom of the drone:
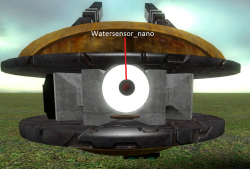 This is only to give the Optical Sensor a target. The reason the one in the picture is red is because I had "paint target" checked for debugging purposes.
- Target props
- Range: 30
- Prop filter: watersensor_nano
- Name the target finder(3) "Optical Sensor"
- Spawn, under "Browse": Wire Model Pack 1->beer->wiremod->watersensor_nano
- Easy-weld the water sensor to the middle of the drone's eye
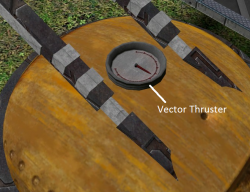
- Spawn 2 vector thrusters, on in front, and one in back. Again, make sure they're aligned facing forward. A good model to use is the speedometer; the arrow pointsforward. Shift+e snap the drone, then spawn the thrusters, and while rotating, hold shift and set them pointing forward.
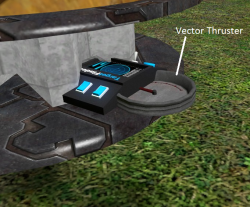 Same deal. For these thrusters, keep them as close to the center line as possible.
- No Effects
- No Effects
- force multiplier: 50
- min: 0
 Again, make sure the needle is pointing forward.
 - max: 1000
- bidirectional
- collision
- works in/out of water
- XYZ local
- Spawn another vector thruster on top of the drone. Alignment does not matter. Use the same settings as above, but set it to XYZ world.
 For the top thruster, alignment or position don't matter. All that is required is that the thruster is set to XYZ world.
Building the base
On the PHX plate, spawn the following wire tools:
- Entity - can see
- Name this "Optic Sensor"
- Constant Value
- 300
- 2
- -2
- -1
- Comparison - Greater than
- Comparison - Less than or equal
- Arithmetic - Multiply(1)
- Arithmetic - Multiply(2)
 Even though this uses a 2x2, a 2x1 is a more efficient use of space.
 - Arithmetic - Average
- Arithmetic - Negate(1)
- Arithmetic - Negate(2)
- Vector - Compose
- Physics - Freezer
- To place this, first left-click on the actual drone body, then click on the PHX plate where you want the controller to spawn.
Wiring it all together
- Facer(X)->Enemy targeter beacon(World_X)
- Facer(Y)->Enemy targeter beacon(World_Y)
- Facer(Z)->Enemy targeter beacon(World_Z)
- Facer(On)->Optic sensor can see(out)
- Freezer(Activate)->Optic sensor can see(out)
- Optic Sensor Can See(A)->Optic Sensor finder(1_Entity)
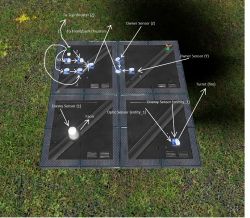 Not all connections are shown, but this gives a general layout for what should be going on.
 - Optic Sensor Can See(B)->Enemy targeter finder(1_Entity)
- Greater than(A)->Owner targeter beacon (distance)
- Greater than(B)->Constant value(300)
- Less than or equal(A)->Owner targeter beacon (distance)
- Less than or equal(B)->Constant value(300)
- Multiply(1)(A)->Greater than(out)
- Multiply(1)(B)->Constant value(2)
- Multiply(2)(A)->Less than or equal(out)
- Multiply(2)(B)->Constant value(-2)
- Average(A)->Multiply(1)(out)
- Average(B)->Multiply(2)(out)
- Negate(1)(A)->Owner targeter beacon(Z)
- Negate(2)(A)->Owner targeter beacon(Y)
- Compose(X)->Negate(2)
- Compose(Y)->Owner targeter beacon(X)
- Compose(Z)->Negate(1)
- Front/back vector thruster(mul)->Average(out)
- Front/back vector thruster(Vector)->Compose(Vector)
- Top vector thruster(Z)->Constant value(-1)
- Turret(fire)->Optic sensor can see(out)
Lightening things up
- Select the weight stool (regular, not wire)
- Set target weight to 0.0000000001
- Click on everything on the drone, excluding:
- Thrusters
- The drone body
- Select the physical properties stool (regular)
- Set target material to metal
- Uncheck gravity toggle
- Click on everything on the drone, everything.
- Select the materials stool (regular)
- Set target skin to "Vol_light001"
- Click on these components of the drone:
- Target finders
- Beacon sensors
- Vector thrusters
- Water sensor nanochips
- Unfreeze everything
- Have fun!
If you have any questions, post something in this page's discussion. Also, if anyone finds a fix to the broken adv_dupe mechanism for the facer and the freezer, please post it in the discussion as well.
Modifications
This is a list of stuff that you can do to further improve the drone, aside from just changing the turret's damage. Add your own if you have an idea:
- For the front and back thrusters, change the front's original thrust multiplier to 10.
This causes the drone to more accurately face forward when moving, instead of rotating aimlessly.
- Add two values to the constant value chip on the PHX plate: 1000 and 10
- Add a "greater than" chip(2) to the PHX plate
- Wire the greater than chip:
- A->Owner targeter beacon (distance)
- B->Constant value(1000)
- Add a multiply chip(3) to the PHX plate
- Wire it:
- A->Greater than(2)(out)
- B->Constant value(10)
- Add an "add" chip to the PHX plate
- Wire it:
- A->Multiply(3)(out)
- B->Average(out) (the one that outputs a +1 or -1 for the vector thrust)
- Re-wire the front and back vector thrusters:
- Mul->add
This makes the drone move 10 times as quickly when more than 1000 distance units away. This is useful in that it causes the drone to catch up to you if trailing behind.
